When making an amendment to an existing functionality for a WordPress website, it is important to thoroughly test any changes to ensure that the site is working as intended and does not introduce any issues.
Having a Testing Checklist
Having a complex WordPress system is essential for our Enterprise clients to succeed. But with complexity comes inevitable errors and bugs which is why having a testing checklist is crucial.

A testing checklist is a document that outlines the specific tests that need to be performed on a website, system or app to ensure it is functioning as expected and to meet the client brief and project scope. Checklists like this can include a wide range of tests, from basic functionality tests; such as checking links and forms, to more complex tests such as registering for accounts and adding content.
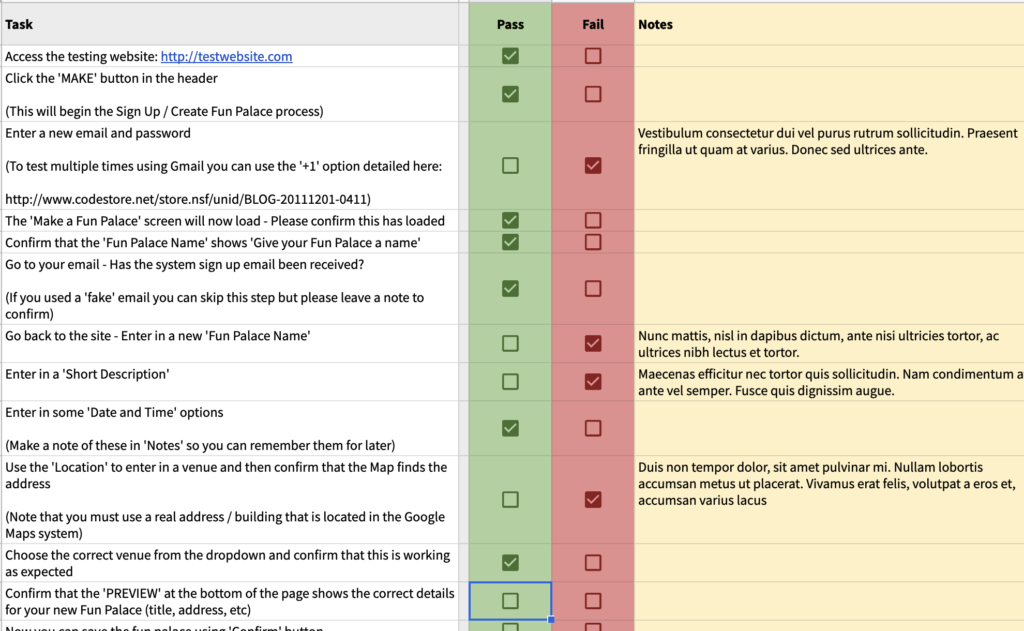
With a testing checklist in your toolset the testing process can be performed more efficiently, saving time and resources and giving you a valuable audit trail. The checklist helps your team and your clients to focus on the most critical areas of the testing process ensuring it is as effective as possible.
Checklist Tools and Outcomes
Here at at Make Do we use a mixture of GitHub checklists, Google Drive Sheets and other Project Management tools such as Trello and Monday but you should use whatever tools you have at your disposal to make sure you get the following outcome:
- Technical assurance: Internal testing is a crucial step that helps to identify and fix issues before the website is handed over to the client for review. To ensure thorough testing, it’s essential to conduct testing on both a local server and a separate development server before deploying the website to a staging server for client review.
- Client sign off and evidence: This is the most critical step as it ensures you have not only the peace of mind that the new features and changes are working but also an audit trail of the testing steps performed by the client themselves.
WordPress Staging and Testing Servers
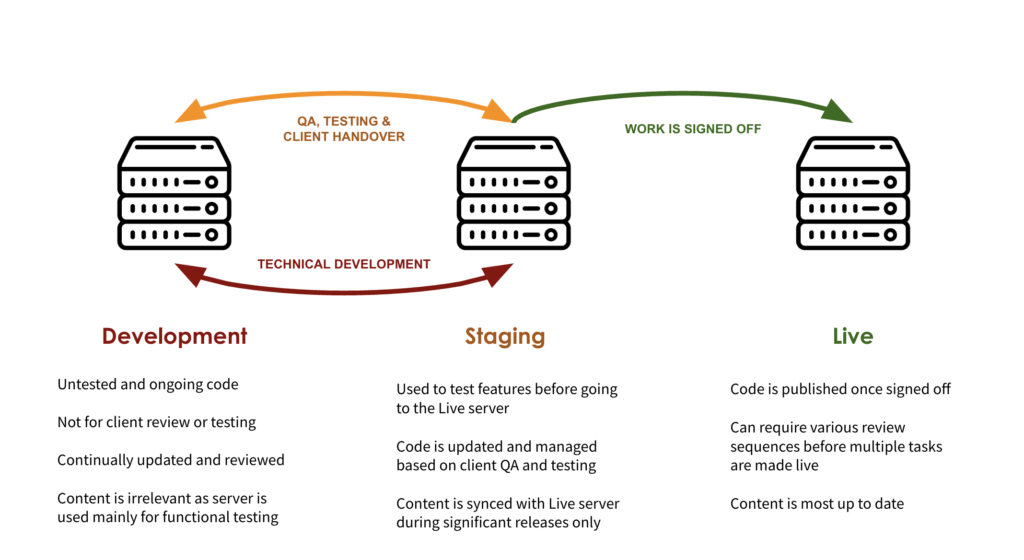
Always ensure that client testing and review is done on a secure staging server that is a 1:1 copy of the live website system. A staging server provides a secure and private environment where the client can review the website and provide feedback before it is made live.
A Rough Testing Guide for ANY Scenario
Need some help? Here are some rough testing steps that could be followed when introducing changes any any scale to your custom WordPress websites:
- Test the functionality on a development or staging site: See above. Essential to do this before making any changes on the live site.
- Test the specific changes made: Test the specific changes made using a checklist to the functionality to ensure they are working as expected.
- Test other / related functionality: This can sometimes be missed but you absolutely must make sure that any related website functionality is still working. For example, if the update changes a form system in WordPress (such as Gravity Forms) make sure that the form submissions are still being processed correctly and any notifications are still being sent.
- Test different devices and browsers: A no-brainer these days. You always need to test the functionality on different devices and browsers to ensure that it is working correctly across different platforms.
- Test with different user roles: If the amendment changes user roles or permissions then use the User Switching plugin to test the functionality with different user roles to ensure that each role has no issues.
- Perform performance and load testing: If the changes are expected to increase the load on the server or change load times on the front-end it is always a good idea to do a benchmark against the live site so you can manage any slowdowns. This is always a great idea for WooCommerce or Membership sites where users will immediately notice any slowdowns.
- Test production/live! Finally, after all the testing is complete, test the changes on the live environment. Just because it worked on Staging doesn’t always mean it will work on Live, trust me!
- Make backups: Always make backups at each step of this process just in case!
By following these basic testing steps, you can ensure that your changes will be thoroughly tested and working correctly while minimising the risk of any issues being introduced on the live site.

Need Complex WordPress Support?
Having a robust testing checklist is essential, but creating one can take time. We hope this article helps guide you in the right testing and direction!